Retrieve the Slurm script
Go to your home directory:
cd
Copy this folder:
cp -R /workspace/visu .
This folder contains a visu.slurm script of which you must modify lines 34 and 35 to put the name of your Slurm account and the duration of use of the visualization node (cannot exceed 24 hours). For example, if your account is math and the reservation should last 2 hours:
#SBATCH --account=math
#SBATCH --time=02:00:00
Launch the job
Once visu.slurm has been modified, you can submit the job:
sbatch visu.slurm
This will create an output file into your visu folder. You can list the content of your folder using:
ll
Print the content of your output file. For instance:
cat visu-41489.out
Copy the line containing an ssh command. It comes after To setup the tunnel, run the following command from your desktop:. For example:
ssh -L 5901:visu01:5901 user9@134.XX.XX.XX
Open a session on the visualization node
Open a second terminal and paste the previous ssh command. A new session opens on Azzurra.
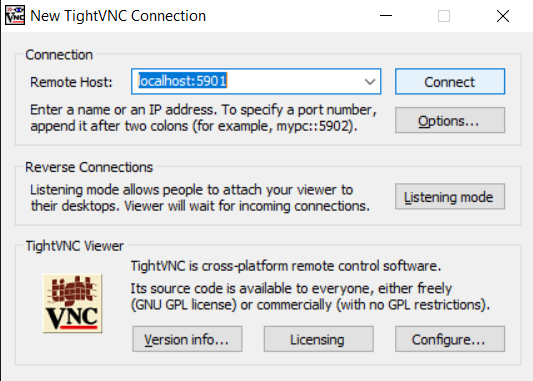
Open a VNC client, for example TightVNC. Your output file shows the Remote Host to define “After successful login you can access the VNC session at localhost:5901 on your desktop”. Type localhost:5901 as Remote Host:

Then, use the password at line 6 in your output file to log in.
Work on the visualization node
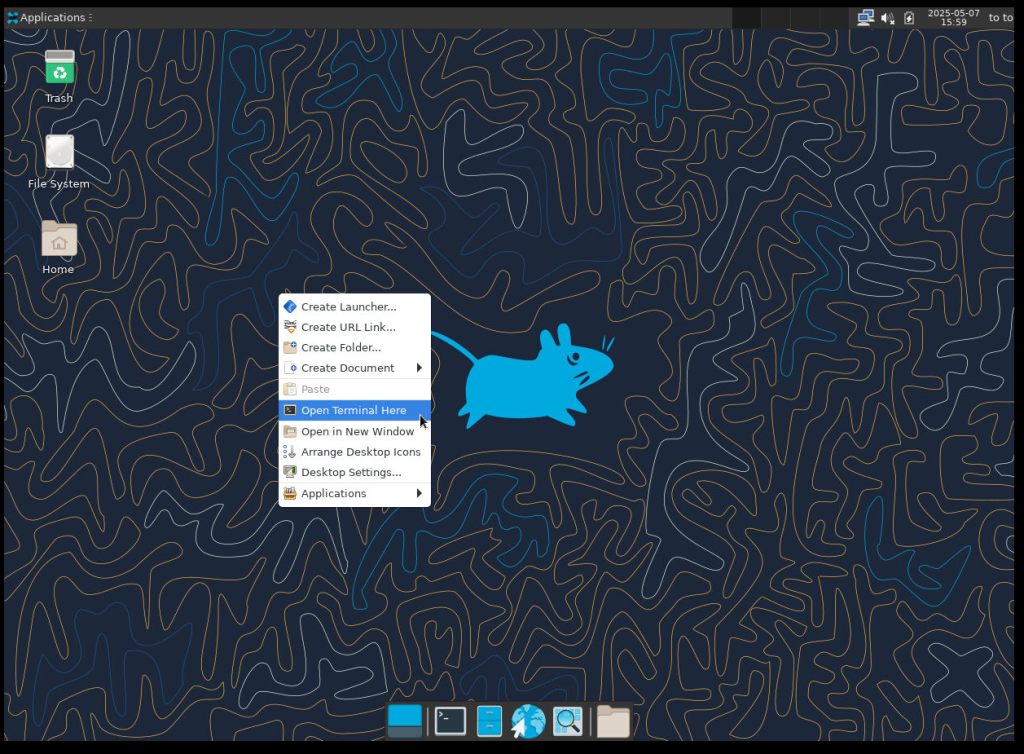
Once connected via VNC, a new window opens. Right click on the wallpaper and click on Open Terminal Here to open a terminal:

To make sure that you use the Quadro RTX 6000 graphics card, precede the command to launch your software by vglrun. Example:
module load paraview/6.0.1
vglrun paraview
Software to be used on the visualization node
To be used only on the visualization node, without loading any module:
- Gnuplot 5.4.3
- Octave 7.3.0
- evince (pdf viewer)
- gthumb (png viewer)
Other visualization software available as modules:
- vmd/2.0.0
- gaussview/6.1.1
- paraview/5.13.3
- paraview/6.0.1
If you need another software to be installed, please contact us.
How to set custom screen resolution
By default, the resolution is 1240×900 and your display’s name is “VNC-0”. You can check this in the visu01 node terminal using the xrandr command.
If you want to modify this resolution, for instance: 1920×1080 and 60 as refresh-rate:
gtf 1920 1080 60
Copy the output line starting with Modeline “1920x1080_60.00” … Start copying at “1920x1080_60.00” … (do not copy « Modeline »)
For example, copy: “1920x1080_60.00” 172.80 1920 2040 2248 2576 1080 1081 1084 1118 -HSync +Vsync
“1920x1080_60.00” is the name of your new screen resolution.
Still in the terminal (do not forget to adjust these names with your own output if you chose another resolution):
xrandr --newmode "1920x1080_60.00"  172.80  1920 2040 2248 2576  1080 1081 1084 1118  -HSync +Vsync
xrandr --addmode VNC-0 "1920x1080_60.00"
xrandr --output VNC-0 --mode "1920x1080_60.00"
The window should be modified automatically. You can check the new resolution with the xrandr command. The new resolution will be applied to the current session only.
