
How it works
During your first connection to the cluster via a terminal, a giant QR Code will be displayed in your window. If the QR code looks distorted or too big, try reducing your terminal’s font size. You only need to scan it once with an authenticator app on your smartphone (such as Google Authenticator, Microsoft Authenticator, Bitwarden, etc.) to save it. The app will then display a code that you need to enter into the terminal. If no code appears, simply close the app and reopen it.
For your future connections, the server will ask for your usual SSH key AND the 6-digit verification code generated by your phone (open the app to see the code, and keep in mind that it changes after a short period of time).
I do not have a smartphone
Install a password manager or authenticator extension (such as Authenticator, Bitwarden, or 1Password) in your web browser.
Click on the extension.
Add an account by pasting the text-based secret key displayed alongside the QR code in your terminal. The extension will generate the 6-digit code directly in your browser with a simple click (or even via automatic copy-paste).
For your future connections, just reopen the extension to display your verification code.
I no longer have access to my verification codes
If you no longer have access to your two-factor authentication app (due to a changed or lost smartphone, etc.), please contact us.
FileZilla
Important: if you still have issues using FileZilla, other software like WinSCP (for Windows) or Cyberduck (Mac) offer a more straightforward way to handle two-factor authentication.
In the FileZilla main menu: Edit > Settings.
In the left column, expand Connection and click on SFTP.
Click the “Add keyfile…” button. Select your private key (your id_rsa or id_ed25519 file located in ~/.ssh). If FileZilla asks to convert it to the .ppk format, accept and save it.
Click OK.
Go to File > Site Manager.
Create a New site if you don’t have one for azzurra yet, then fill it out as follows:
You need to enter your azzurra username in the User field, and most importantly, select Interactive for the Logon Type.
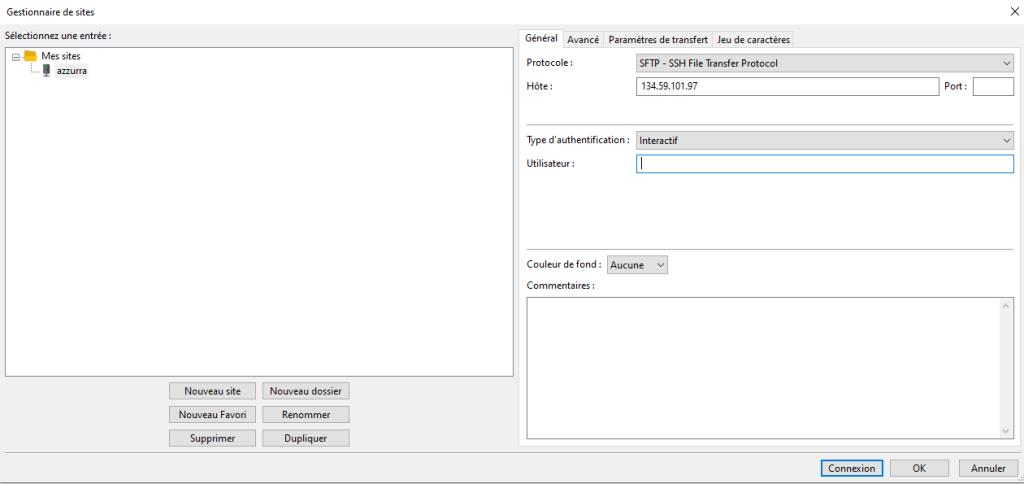
Then, when you connect, you will need to enter the passphrase associated with your SSH key (if there is), followed by the verification code displayed on your phone.
If you get a “No more authentication methods available” error, go back to File > Site Manager, and in the “Transfer Settings” tab, make sure the “Limit number of simultaneous connections” box is checked and strictly set to 1:

VS Code & Connection Multiplexing
To prevent VS Code from asking for your 2FA verification code every time it opens a new window, folder, or terminal, you must use SSH Multiplexing. This allows all VS Code processes to share a single, secure connection tunnel so you only have to authenticate once.
Linux / macOS
Multiplexing works natively and flawlessly on Unix-based systems.
- Open your local SSH configuration file (
~/.ssh/config) and add the following lines:
Host login-hpc.univ-cotedazur.fr
     HostName login-hpc.univ-cotedazur.fr
     ControlMaster auto
     ControlPath ~/.ssh/sockets/%r@%h:%p
     ControlPersist 10h
- Before connecting for the first time, you must create the socket directory on your local machine with the required security permissions:
mkdir -p ~/.ssh/sockets && chmod 700 ~/.ssh/sockets
Windows
To use multiplexing under Windows without locking up the 2FA authentication process, you must configure both your local SSH file AND a specific setting inside VS Code.
Step 1: Configure your local SSH file Open your C:\Users\YourName\.ssh\config file and add the following lines (this configuration safely targets your user profile and does not require any administrator privileges):
Host login-hpc.univ-cotedazur.fr
    HostName login-hpc.univ-cotedazur.fr
    User your_azzurra_login
    IdentityFile ~/.ssh/id_rsa
You need to replace your_azzurra_login with your azzurra username and you may need to remplace the IdentityFile path which needs to be your private ssh key location. The file is usually named id_rsa or id_ed25519 (it has no .pub extension).
Step 2: Configure VS Code (Mandatory)
- Open VS Code on your computer.
- Open the Settings (gear icon in the bottom-left corner ➡️ Settings).
- In the settings search bar, type:
remote.SSH.useLocalServer - Check the box (or set the option to
true).
This option forces VS Code to rely on the native Windows OpenSSH client (which handles multiplexing perfectly) instead of attempting to spawn its own parallel, unstable connections alongside the 2FA prompt.
Daily Workflow (Windows, Mac & Linux)
The procedure is now identical for all operating systems and guarantees an instant connection:
- At the beginning of your workday, open a standard terminal (or a PowerShell window on Windows) and log into the cluster:
ssh login-hpc.univ-cotedazur.fr - Enter your password and your 6-digit 2FA verification code. Once successfully logged into the cluster, leave this terminal open in the background (you can minimize it).
- Launch VS Code and connect to the cluster via the Remote-SSH extension.
The Result: VS Code will automatically detect the active tunnel established by your terminal, piggyback onto it instantly, and open in less than 2 seconds without ever asking you for a 2FA code or password for the next 10 hours.